
THE CRYSTAL COSMOS: JOHN's GIGAPIXEL MICROSCOPY TECHNIQUE
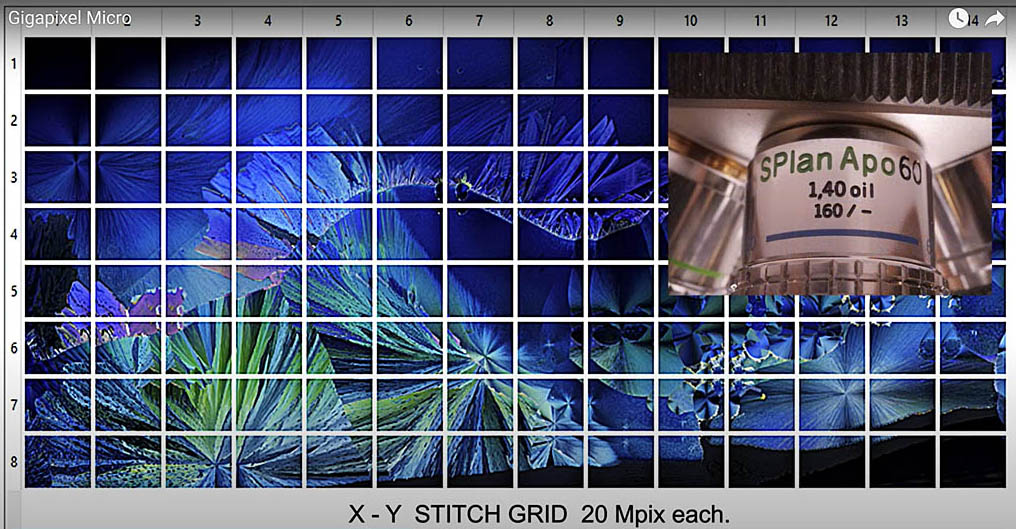
John started doing photo-microscopy way back in 1984. He used an Olympus BH-2 microscope to photograph tiny crystals grown on a microscope slide by either cooling a melt or evaporating a saturated solution. With polarized light illumination such crystals show astounding colors, and, along with somewhat unpredictable and sometimes astonishing structures, proved a fertile ground for exploration of this niche of the micro-world. His early photographs were made on 4x5 inch sheet film. Prints were exhibited at local galleries and special exhibitions. Many of these early film images were eventually digitized and some were submitted to the Nikon Small World photo-microscopy contest, starting in 2000, where several received various awards. Over the years he returned to the microscope from time to time to make videos of Oil Films and Soap Films, and to do 3D conversions,Skip forward to 2020+. Covid severely limited travel to make stereoscopic movies, or to show videos at 3D conventions and film festivals. So what can be done isolated in the lab with a 35 year-old microscope? The resolution of a print made from a photomicrograph (even off a sheet of 4x5" low-grain photographic film) depends primarily on the microscope objective lens being used. Something like 20 mega-pixels is overkill for most all visual-light objectives. Thus a print made from a 2X objective lens will appear decently sharp up to about 11"x14". When you make a substantially bigger print for a gallery, and walk up close to it, parts of the picture will start to look fuzzy. One popular approach is to stitch together several digital images into a "panorama". Thus one might make an 8x4 foot print from 32 of these 2X pictures. This can work for subjects that are relatively smooth at small scales. However, many crystals, like these single frame shots, or these, have intricate details that are revealed at higher magnification. We want to see these fine features up close and fully sharp, while also being able to stand back (or zoom out) and observe the entire panoramic structure. A solution is to use a high-magnification high-resolution (high numerical aperture) microscope objective to zoom in on the details (e.g. 10X to scan a 1X original-sized picture, 20X to scan a ~2X image, 60X to scan a 4-10X original image). The idea is to shoot a lot of these high-magnification images on an X-Y grid, and blend them together in order to make a large print with gigapixel resolution. There is one significant issue. Many crystals, especially when grown from a melt, and when observed at high magnification, exhibit focus problems. Focus can vary either as you scan around the microscope slide, or within each individual X-Y picture itself. Even hand focusing at each X-Y grid point won't always work, because the specimen may be too thick for the high magnification being used. It is not totally in focus. Thus, in most cases it was found necessary to do "focus image-stacking" at each X-Y stitching grid point, often with a 10X objective, and always at 20X and 60X. In "stacking", a sequence of images is obtained as the microscope's focus is racked through the specimen. Then a program (like Zerene Stacker) is used to composite, or blend together, all the in-focus parts of each frame in the stack. At each single X-Y position one all-in-focus image is thus obtained. The collection of these is then stitched (or 'tiled') together. One practical difficulty is the acquisition and processing of the huge number of images so generated. For example, a 20 by 20 X-Y stitch-grid with 50 focus-stacked images at each location results in 20,000 pictures to be:1) Acquired by scanning the microscope stage in X and Y, and taking a focus stack at each location.2) Downloaded from the camera flash card to a PC and batch converted from RAW to 16-bit tiff's.3) Reorganized into folders, each containing all the stacked pictures (e.g. 50) for an individual location (e.g. 20x20=400)4) The folders containing the "stacks" are batch blended into (e.g. 400) all-in-focus images.5) These are then stitched into a "panorama".6) The final panorama is adjusted in Photoshop as needed (using the huge .psb gigapixel file obtained from step 5).
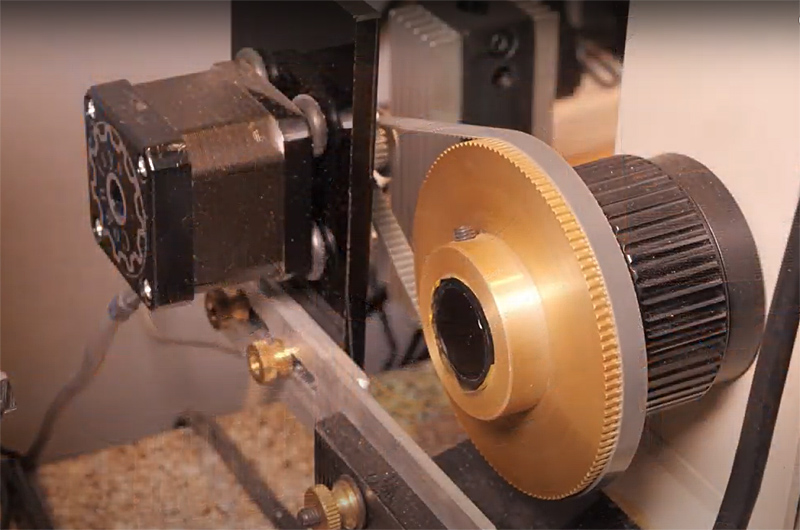
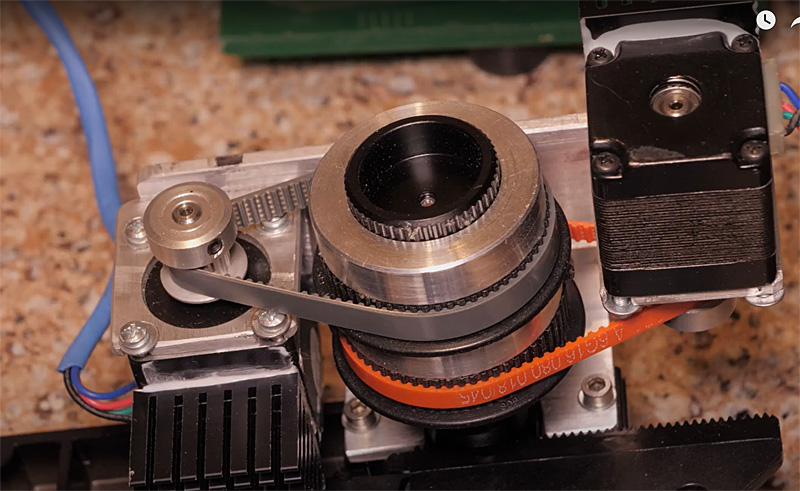
Focus drive stepper motor. DIY dual X and Y stepper motor drives mounted on an Olympus BH2 microscope stage. John built a stepper motor drive for his old BH2 microscope X-Y stage, and mounted a timing-belt geared-down actuator for the Olympus BH-2's fine focus. He wrote a program in visual-Basic to control acquiring the X-Y grid, while commanding a "Stack Shot" focus-drive to get an image stack at each X-Y location. Thus the "acquiring" part is fully automatic, and takes typically a couple of hours. Next the sequential file-set is downloaded from the camera flash drive to a computer, converted from RAW to 16bit-tiffs, and broken up into folders (by another DIY program), each containing the focus-stacked files for a particular location. These folders are processed using Zerene Stacker's batch mode. The 20x20'ish output is stitched by PTgui. |

© Hart3D - All Gallery images and videos are copyrighted John Hart. All rights reserved. No part of these pages, either text, videos, or images, may be used for any purpose other than for personal viewing. Reproduction, modification, storage in a retrieval system or retransmission, in any form or by any means, electronic, mechanical, or otherwise, is strictly prohibited without prior written permission.
|